Getting started
Welcome to CanCred Passport, a free home to store and share open badges that recognize your achievements and further your career. These tutorials will help you get the most out of your account in CanCred Passport.
What’s an Open Badge?
Open Badges is the world’s leading format for digital badges. Open Badges is a type of digital badge that is verifiable, portable, and packed with information about skills and achievements. It’s a whole new way to recognize learning and achievement. Well over 40 million badges have been issued to date.
Find out more on our About page or at openbadges.org.
Accept your first badge
How to accept a badge in various ways:
- to share directly to social media such as LinkedIn
- to download and store on your computer
- to start a badge portfolio in CanCred Passport!
You will receive an email from [ISSUER ORGANISATION] via CanCred, with a subject line saying something like: “Claim your badge: [BADGE NAME]”. The email will contain a link that says something like Get your badge. Select the link to go to the badge acceptance badge.
NB: You can also register for a free account on CanCred Passport before you receive a badge. There is an extra step to confirm your email address. You can also earn a first badge by completing a CanCred Passport Member badge application form (no special requirements) and then just follow this same sequence when you receive the email awarding the badge.
If this is your first badge from this organisation, you’ll be asked to accept the Privacy Notice because they had to use your name and email to issue the badge. Once you accept it, select the button [Continue].
In the badge acceptance page that opens up, you will have up to 3 choices for accepting the badge, depending on what your badge issuer selected:
- Share a link directly to LinkedIn (or Facebook or Twitter)
- Download a PDF version of the badge to print or attach to an email (may not be provided by your issuer organisation)
- Create a free badge portfolio on CanCred Passport for this badge and any badges you may earn in the future
You can do one of these, or all of them - now or later.
We’ll take them in order:
Share a link directly to LinkedIn
(HINT: Have your LinkedIn page open in another tab of your browser before you start)
- Select the LinkedIn icon on the badge acceptance page under the box Share badge URL.
- A form window opens on the LinkedIn site labeled Add license or certification. Check the pre-loaded information on the form. If it all makes sense, select Save.
(One thing to check: the Issuing organization should have a branded logo, if the organization has a company page on LinkedIn. If you don’t see a logo, try searching for the organization using the dropdown menu.) - After selecting Save, check the Licenses and certifications section on your LinkedIn profile to see your badge. It should be nicely displayed with the logo of the issuing organization and a link that says See credential. If you follow that link you’ll find your hosted badge on CanCred Passport.
Download a PDF version of the badge
- Go to the Download PDF section of the badge acceptance page and select the PDF link for the badge.
- If it is a multi-lingual badge, there will be a download link for each language version.
- The PDF that you download contains the same information as the badge, in a “Portable Document Format”, that you can use right away: print it, store it on your computer, and shared it as an email attachment. You can even upload it later to a free account on CanCred Passport, if you haven’t already accepted it there.
- A QR code at the end of the PDF connects to a validator service, so your offline PDF badge can be verified online.
Create a free badge portfolio on CanCred Passport
- Go to the CanCred Passport section on the badge acceptance page and select the button [Go to Passport]
- A page opens that says something like CONGRATULATIONS YOU HAVE GOT A BADGE!
- Select the link Create new account. Review the Terms of Use and Privacy and Cookie policy for the free CanCred Passport service. Accept these if you agree and select the button [Continue].
- In the simple registration form that opens, check your preloaded email address and enter the following:
- A strong password (twice)
- Your first name
- Your last name
- Your preferred language
- Your country (normally Canada)
- Select the button [Create new account]
- In the Thank you screen that opens, select the button [Continue]
- Your Passport Dashboard page opens. You should see a button that says [You have a new badge waiting] in the top right quadrant of the Dashboard. Select it.
- Your Badges page opens with the badge you have earned waiting for your acceptance. Select the button [Accept badge]
- In the Set badge visibility box that opens, select PUBLIC if you want to be able to share your badge to social media and other public sites
- Your new badge is now visible on your Badges page, ready to be joined by many more badges! CanCred Passport accepts all badges that conform to the Open Badges standard. These may come from:
- The organisation that issued this badge
- Other badge issuing organisations on CanCred
- Open Badges you upload from your computer
- Badges you can import from other Passports, Wallets and Backpacks
Check out the other tutorials on this page to learn more about how you can build up your own badge portfolio on CanCred Passport!
Share a badge on LinkedIn from Passport
As we showed above, you can share a badge directly to LinkedIn without using CanCred Passport. But you can also share a badge to LinkedIn from Passport. It’s pretty easy.
NB: These instructions are designed for laptops and desktop computers.
Go to your Badge page and select the badge you want to share
Select the Social tab in the pop-up window that opens. Make sure the badge is set to [PUBLIC] so it can be shared.
Select the LinkedIn icon under the heading Share this badge.
A pop-up window appears labeled Share on LinkedIn with two options. We’ll guide you through both options.
Add to profile
This will publish your badge as a fixed Certification in your Profile:
Select [Add to profile]
CanCred opens up a Certification form on LinkedIn with your badge information already entered. Select the Issuing organization field to choose a branded link to the issuing organiztion, if the organization has a company page on LinkedIn; otherwise, simply accept the unbranded option.
When finished, select [Save]
Your badge is now visible in the “Licenses and Certifications” section of your LinkedIn profile.
Other LinkedIn users can select [Show credential] to verify the badge.
Share as a post
You can also share your badge as a dynamic post in your LinkedIn newsfeed:
Select [Share]
Select [Share in a post]
Type a short message for your post, such as “My new badge…”
Select [Post]
Other LinkedIn users can click on the badge to see the hosted version on CanCred Passport. [Show credential] to verify the badge.
Building up your Passport
Having your own badge Passport means more than sharing badges to LinkedIn. It’s like a badge portfolio with benefits.
Build your Passport Profile
Edit your Profile and share it to LinkedIn.
Set your location on the map
Locate your CanCred profile and badges on a global map.
Import badges
TIP: Make sure you have the right email IDs for your badges
Badges are linked to email addresses. If your badges have been issued to more than one email address, you need to add those other addresses to your Passport account to be able to import the badges.
Quick instructions
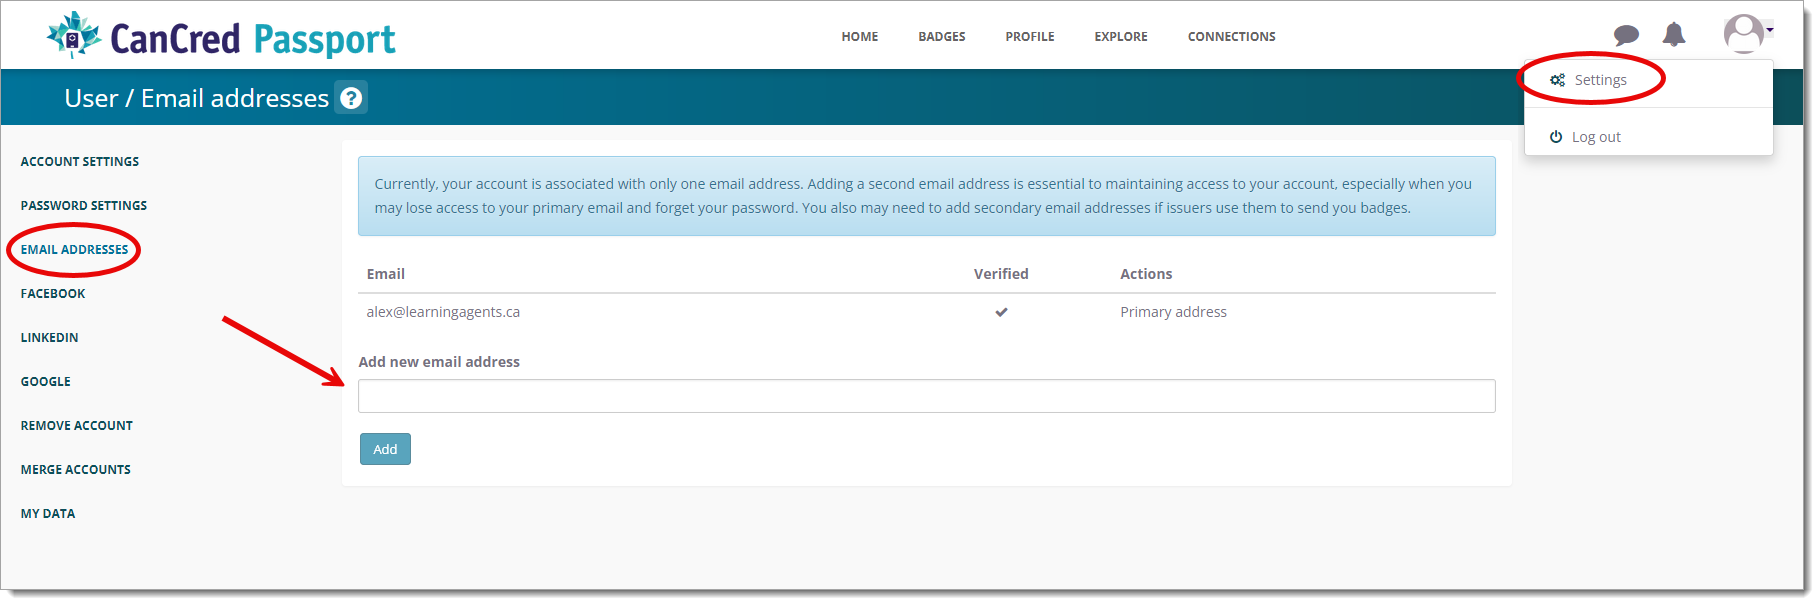
- Log in to your Passport account and select Settings at the top right.
- On the ACCOUNT SETTINGS page that is displayed, select EMAIL ADDRESSES
- Enter a valid email address that you have access to - select the [Add] button
- Check your email inbox for the verification message, which includes a link and instructions to verify your email address. Please confirm your email promptly. If the message is not in your inbox, check your spam folder.
- Once the email is verified, your Passport account can accept badges issued to that email.
TIP: Accept badges by default
You can make importing, accepting and sharing badges faster and easier by choosing to accept new badges by default.
Quick instructions
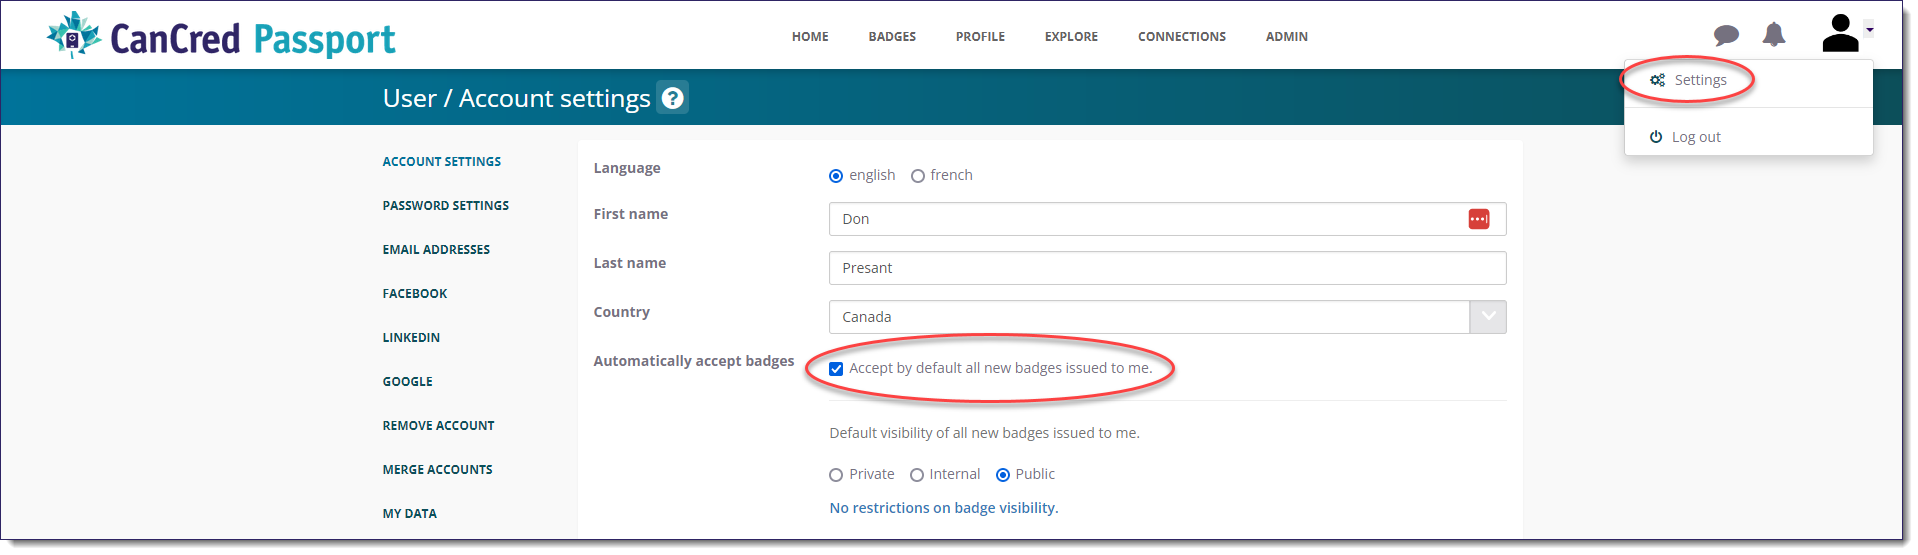
- Log in to your Passport account and select Settings at the top right.
- On the ACCOUNT SETTINGS page that is displayed, select Accept by default all new badges issued to me. Select the Default visibility: Private, Internal (on Passport) or Public.
- Select the [Save] button at the bottom of the page.
Upload a badge
Upload a single badge to your CanCred Passport.
Quick instructions
- Log in to your Passport account and select the BADGES tab
- On the MY BADGES page, select the [IMPORT] button
- On the IMPORT page, select the [Choose file] button
- Select the badge to upload
- Close the Badge uploaded message
NB1: Make the badge PUBLIC so you can share it! See Share a badge on LinkedIn from Passport
NB2: Auto-accept badges that are PUBLIC by default! See TIP: Accept badges by default
Multiple ways to import badges
This video covers different file formats, why certain files can’t be uploaded and how to import badges directly from other platforms.
Quick instructions: SYNC
This method works for badges that have been issued to your email ID from any issuer on CanCred Factory.
- Log in to your Passport account and select the BADGES tab
- On the MY BADGES page, select the [SYNC] button
- Close the window that says _X badge(s) successfully synced_
Quick instructions: Import badges with an assertion URL
NB: the “assertion URL” is the web address of the badge that was issued to you, using your email as ID. It is typically located on the platform that issued it to you.
- Log in to your Passport account and select the BADGES tab
- On the MY BADGES page, select the [IMPORT] button
- Scroll down to the section that says “Import badges with assertion URL”
- Paste the assertion URL from the source platform
- CanCred Factory example: https://factory.cancred.ca/v1/assertion/xxxx
- Close the window that says Badge uploaded
Quick instructions: Import a list of badges
You can import multiple badges at once by uploading a .txt file containing a list of badge assertion URLs.
NB: This list can be generated on another Passport under BADGES > Export badges, so it’s a quick way to move badge collections from one Passport to another. This method can work for ALL your badges from any platform, as long as they are still verifiable according to the Open Badges standard, and if you have verified your ownership of the emails that were used as your ID when they were issued. So, before starting, check that you have verified all your email addresses in your Passport Settings (Settings > EMAIL ADDRESSES).
- Log in to your Passport account and select the BADGES tab
- On the MY BADGES page, select the [IMPORT] button
- Scroll down to the section that says “Import a list of badges”
- Select the button [Choose file]
- An Uploading badges window is displayed, showing progress.
At the end of the process, the display changes to Upload complete (X uploaded, X failed), with an Error log below for the failed badges.
The error for wrong email is “User does not own this badge”.
There are many other verification errors related to non-compliance with the Open Badges standard. You can try to import those badges using the other methods, but they may not longer be verifiable for a variety of reasons, including the Open Badges standard itself, platform shutdown and/or assertion erasure, assertion revocation, etc. - Close the window that says Upload complete
Download and share a PDF badge
Create a Page in your Passport
Coming soon!